Black Gold Saw- Skeletal Claws Progress

What is this?  An update?  Gasp! Shock!  But since I finally have some time on my hands, I was able to mostly finish the claws for BlackGold Saw

So I started by making a few sketches from the  BlackGold Saw figma on which I will be basing my costume.

And then I will pose. Just like this. In front of a wind machine.
I was inordinately excited to be making skeletal looking claws, because I have this strange obsession with bones and pseudo-anatomical correctness, so I spent much time carving and shaping them until they resembled elongated human phalanges.  Oh, and if you haven't figured it out yet, I'm kind of weird.

So I started with Premier stone clay by La Doll, and I found that it is very lightweight but also very sturdy.
I have tried to break my prototype claw, but I have yet to succeed without damaging furniture.
It can be found at pretty much any craft store, and while it is a little pricey, you'll find that the small package actually goes a surprisingly long way.  I managed to make all ten claws plus two prototypes and two "oopsies" when I realized that I needed to flatten out the proximal digit so that it would fit on my finger without being too bulky, and I still have a bit left in the package.

So here are a couple of the claws after they had been carved and let dry for 24 hours.  I think this is a pinky claw and an index finger.

Why hello, Xbox 360, fancy seeing you here
Post paint!

You have no idea how many times I had to retake this picture for it to not come out blurry.  
The claws have been painted with a gradation of red to black.  I'm afraid my camera doesn't really do the colors justice, though.  In order to keep the paint from chipping, I decided to gloss them.  I had bought Sculpey glaze for this express purpose, but after going over one of the claws, it became readily apparent that the paint was cracking, peeling, and bubbling.  So...that idea was definitely out.  The solution?  Clear nail polish.  No cracking or bubbling, and it's cheaper than proper glaze anyway.  Extreme laziness ftw.
Since this may turn into an impromptu anatomy lesson, here is a human hand for your viewing pleasure.
Now there is a reason aside from my own morbid fascination that I have included this lovely anatomical diagram.  I wanted to try and explain where I attached the claws to my own fingers, and this is the best way that I know how.  The claws that I crafted give my hands the impression of having an extra phalanx, increasing length and creepiness.  The claws are attached to my hand at the point between the middle and proximal phalanges, so that I am able to retain most of my mobility and grasping ability.  

I used a satin opera glove that I had lying around (and yes, I actually have several pairs of opera gloves lying around my apartment, thank you very much) as the base for the claw.  Then I used a hot glue gun to attach the claws to the gloves at the beginning of the middle phalanx of my hand.  Of course, this means I was wearing the gloves while gluing things to my hand.  Not quite as painful as I had anticipated, but I'm sure there are easier ways to do it that involve fewer burns. 

And I even have the mobility to use a camera (even if my claws kept photobombing my pictures)
I am also in the process of making some more proximal phalanges and possibly metacarpals to go on top of the gloves to give the appearance of entirely skeletal hands, but that will be updated later. YAY CLAWS.  Time to go freak out the neighbors.

Next up- the perils of sewing pleather. 

~Kathryn

Sailor Moon R: Sailor Pluto

sailor moon r cosplay - sailor pluto by sayaThe oldest among the Sailor Senshi, Sailor Pluto has been described as distant and somewhat lonely. This is possibly due to duty of being stationed at the Space-Time door entrusted to her by Queen Serenity. However, she does consistently display warmth and affection for Chibiusa, and later cares for Hotaru along with Michiru and Haruka.

Another epic cosplay by Saya! I wonder why I’m getting a lot of her photos lately. I guess her fans are missing her a lot these days? Thanks to Maritess for sending this in and to MPzero for the awesome photography!

Oh No! Manga CosplayBook: Call for Entries

Oh No! Manga will be publishing a CosplayBook and you are cordially invited to become a part of it!

Contribute your best shots to the Oh-No! Manga CosplayBook, out this September, 2012! Email 4 best photos to feature@ohnomanga.com with a short description about your cosplay background: your Alias, how you got into cosplaying, your specialty, and advise to those who would like to get into the hobby!

by: Oh No! Manga

This is open to all cosplayers from everywhere in the world! For more information, please check out their Facebook Page! Better hurry though, slots are limited so choose wisely and good luck! ♥

Kuroshitsuji: Sebastian Michaelis 10

kuroshitsuji cosplay - sebastian michaelis 10

In recent chapters of the manga as well as the second season of the anime, it was revealed that Sebastian Michaelis wasn’t always the perfect butler that everyone knew. In fact, he and his master, Ciel Phantomhive, often got on each other’s nerves during the first few days (or perhaps even weeks) of Ciel’s return as the head of the Phantomhive household. In the end, they managed to sort out their differences and “compromised” to some extent.

That is just so awesome! The angle of the shot, the expression on the cosplayer’s face, and the hand gesture looks so in-character! Thanks again to Fumiki for sending this in!

How I made my Akemi Homura Costume

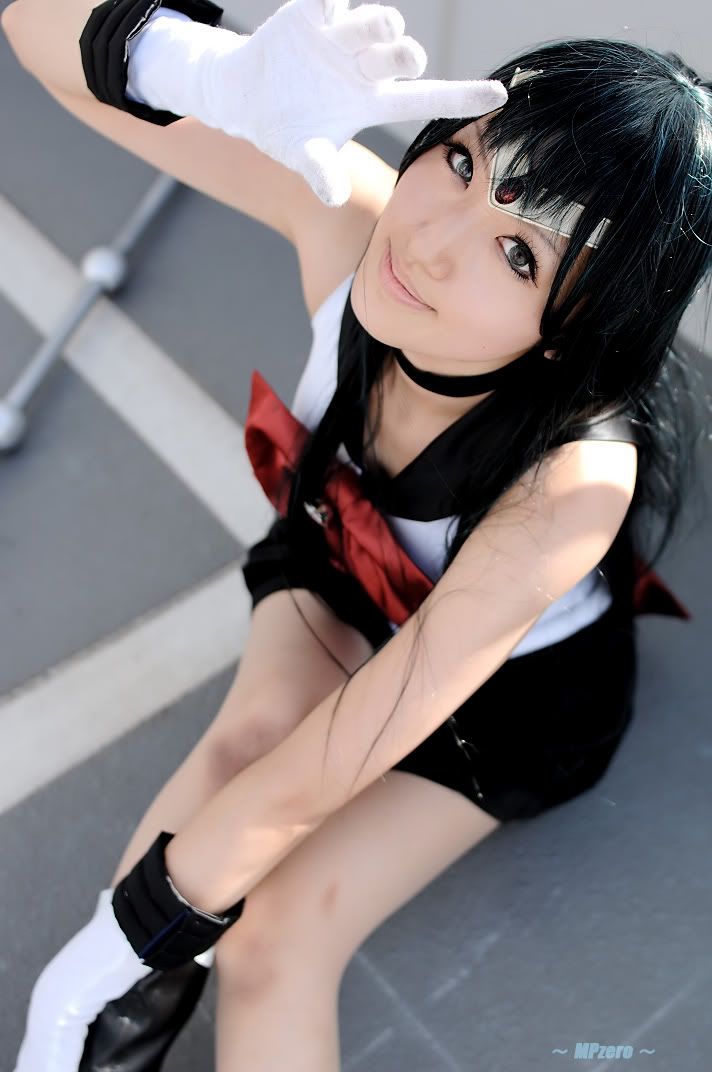
In this entry, I’ll share with you guys how I did my Akemi Homura costume. The costume looked really simple on first sight but as usual, it is not if you want to stay accurate.

_DST3814Homura_Akemi_Anime_Design

1) The White dress Top

IMG_1917

The white dress top was made with a very soft cloth, a sort of polyester satin mix. To avoid shining the cameras to death, I used the reverse side of the fabric. I’m a fan of using the reversed side of fabric for costume as they tend to give an interesting and subtle glean.

It’s an unusual choice of fabric. Like most people, I would usually go for polyester cotton or something similar since Homura's dress definitely looks opaque white. But in view of the fact that she wears another high collared top inside, I decided it is wiser to choose a fabric that is thin and allows for better ventilation. I don't fancy dehydrating in costume's xD

IMG_1904But I was really regretting my choice of fabric halfway through the construction of the dress. Because soft fabric like these tend to slide around and they are such a hassle to work with! And as usual, I screwed up the measurements many times.

I based my white top on a basic 1 piece dress pattern. I first drafted half of the dress pattern on paper to get the sizing right. As you can tell from the photo, I also used a marker to mark out where the shoulder flap would be to assist me in my visual gauging. After I made sure I got everything right, I proceed to add the shoulder flaps.

If you are not very confident in your dressmaking skills, my tip is to always test and trial with paper first! Even for the grey shoulder flaps, I tested with newspaper before cutting my fabric. 

Click on the picture to see in full.


After I was extremely convinced the white dress would fit me perfectly, I went ahead to mark out where the grey shoulder flaps would go. Making sure I leave an extra 1 inch of allowance, I then cut the extra fabric away.

IMG_1917

Using my trusty fabric glue, I glued very thin black ribbons onto the grey shoulder flaps just like how Homura has hers. And then hand stitched the grey shoulder flap onto the dress.

2) Black Inner top

IMG_1921IMG_1925

This is how the black inner top looks like. The zip in front starts below the throat and opens all the way to facilitate wearing. And as you can tell, I made it significantly shorter than my upper torso. The reason for designing it so, is to reduce the bulk of the costume around my waist so I’d look less fat and also for better ventilation.

IMG_1935

This is how the confusing collar looks like. It took me sooooooo many trials to get the right pattern ! I have seen many Homura costumers who created her collar by splitting it into a ‘collar ring’ and another addition flap. But I was insistent on making it a single flowing design just because I think it is nicer.

IMG_1907IMG_1908IMG_1909

This is my paper pattern for the collar. I made and remade so many of them I pretty much forgot which is the final one. LOL =x Don’t worry, this pattern should be fine =X

As usual, collars are always made with 2 layers (main cloth and a lining layer) to ensure the edges are nice.

IMG_1938

Sew the bias on after attaching the collar to the top.

3) Pleated Skirt

IMG_1303

I made her skirt as a tight knife pleat skirt with lace at the bottom. In fact, I was so lazy I didn’t even bother to make a new skirt. I just altered it from my Kuchiki Rukia Skirt xDD

Watch the video and read my blog entry to learn how to make a pleated skirt

4) Her hand accessory

IMG_1114

I panicked when I realised they don’t sell diamond shaped gems in the stores =_= So I had to make one myself (again!).

JPEG Image (44662)

The diamond gem is made with clear plastic sheet. The idea of it is the same as building a paper model, but with a strong plastic sheet instead.  I first tested the size and shape with a normal paper. After I was satisfied with the template, I traced it onto a piece of paper. I then laid my transparent plastic sheet over it and traced over it with a permanent marker.

JPEG Image (44693)

The black lines are where to cut. I then create a wedge at the 4 corners of the plastic sheet and stick everything in place with a clear scotch tape. JPEG Image (27944)

Lastly, paint the gem. I used purple nail polish left over from my Mogami Kyoko (Prisoner) cosplay xD. My apologies for the lack of photographs. Didn’t have much time to snap progress photos >.< .

IMG_1952The plastic gem placed in the wire frame before colouring to gauge the size

Much like how I did my Alastor necklace (Shakugan no Shana), I made the edge of Homura’s accessory with Gold coloured wires.

IMG_1951

I placed the finished gem on a paper and traced the edges out. Then from the diamond base, I went on to draw out the rest of the accessory. This drawing will serve as a guideline for my wire.

87

What happens next is a lot of twisting and turning with my bare hands. To facilitate the sculpting process, I stuck the wire on to the paper with clear scotch tapes so the wire will stay in place.

JPEG Image (27944)

Super glue the gem to the wire frame.

IMG_1892IMG_1897

After my first photo-shoot, I had the unfortunate chance to discover that the super glue alone was not enough to hold the gem to the wire. So after that shoot,  I stuck a layer of gold adhesive tape to the bottom of the accessory to, hopefully, hold everything together better.

Finally done! Yes, I do understand it’s not very accurate but I tried my best T__T

5) The collar and back bows

IMG_1913IMG_1914

I was in such a rush the first time I made the costume I failed to think through each procedure properly. And ended up doing a pretty shameful job with the back bow.

photo 2

The black diamond-ish designs are cut outs from black felt. In order to know how to cut, I stuck the base of the ribbon onto a piece of paper and traced around it. Then draw out the design on the paper and cut it out as a template.

The bow is basically 2 layers of cloth, sewed and then turned inside out. The black diamond-ish designs are then cut and stuck onto both sides with my trusty fabric glue.

 IMG_1930

If you are making a Homura Akemi costume, remember to sew/stick the black diamond designs on FIRST before sewing the 2 layers of cloth (for the ribbon) together. I sewed and hot glued a big safety pin at the back for easy wearing.

IMG_1926IMG_1929

Using a similar procedure as the back ribbon, I made a long fabric tube for the front ribbon and then twist, cut, sew them together in place. A bendable wire was inserted into the top part (where my finger is touching) of the bow to keep it horizontal.

=============================================

Alright, this marks the end of my entry. If you enjoyed it, please leave me a comment ^^.

Cosplay: The Series 1st Anniversary Event (Bandung, Indonesia)

Last weekend, I had the good chance to not only visit Indonesia but also attend Cosplay: The Series' first anniversary event that was held at the Coffee Clinic at Bandung, Indonesia.

559036_302735966459811_123095181090558_710242_817926216_n[1]


My day begun at around 9am. I woke up to an SMS from Chizu who was my host for the entire trip.  She had to pick up her drum pads for the event and I had to wake up xD I continued to just dilly dally around until Kaoru and her Brother came to pick me up at 10:30am. Then a mad rush to get ready ensued xD. foreverslow.jpg

I finally got everything together around 12+ and off to the event we went !

IMG_1984


The event was scheduled to start at 2pm but everyone was here early!

IMG_1990


The event is actually held in a newly opened 3 storey cafe called Coffee Clinic. It was a quaint little cafe up in the hill with a very refreshing scenery just beside it. The ground floor was alfresco dining.

IMG_1991IMG_2010IMG_2018IMG_2003IMG_1992

The view just beside us =)

IMG_2016

IMG_2014

Bonni, Zilkrie and Kazu discussing something important before the start of the event.

And you know what? This photo is scripted =_=;;

IMG_2013

The 3 of them were so aware of the camera, THE MOMENT i raised my puny gear, their victory sign came up LOL! I then commented in annoyance ( lol. bossy) that I was trying to take some BTS photographs of them hard at work and not some poser-ish portraiture. They immediately succumbed to my demands and cooperated by pretending to get back to work xD

Yes… One does not simply snap sneaky pictures of a web drama cast … xD

IMG_2019


IMG_2000


CTS's event standee beside the registration counter. It's a really queer feeling to see my own face on it so I tried my best to avoid eye contact with it throughout the day hahaha.

IMG_2033

My green tea macchiato ( i think >.<) with 2 incredibly interesting syringe of syrup! Adjust your own sugar intake with these syringes!

IMG_2044 

How the stage looked like from my perspective.

Stealing some photos from other event attendees since my photography skills sucked.

cts_1st_anniversary_by_nienzien_ya-d4xdt7octs_1st_anniversary_3_by_nienzien_ya-d4xdvescts_1st_anniversary_2_by_nienzien_ya-d4xdupp 
Photo credits: Oni of Ekyu

Programme of the day includes karaoke performance by the very talented crew of CTS, band performances, screening of exclusive Behind-The-Scene videos, auditions for season 3, a discussion panel that I was involved in and the announcement of numerous upcoming new releases. That's a very long sentence I know xD  it's almost as long as the event itself which was from 2pm – 9pm.

Since I reached the event at 12 and left at nearly 12am, the event was a full 12 hours for me! I admit, that was the longest I've ever survived in a costume.  For someone who always get a headache wearing wigs, that's a huge feat for me !

Anyway back to the event !

IMG_2080IMG_2078IMG_2050

Highlight of the day was the talent audition finals for Cosplay: The Series’ upcoming seasons. The finalists went through a rigorous round of competition to be here so each one of them was on the stage to wow us.

IMG_2088

If I understood correctly, the finalists were not only judged based on their stage performance but also on the creativity and depth of the characters they designed. It was amazing how deep some of them went ahead to conceptualise their own original characters.

581183_319934664739941_123095181090558_750960_1389763854_n

In the end, 5 talents were accepted and each with a very different style. EDIT: Apparently I remembered wrongly and 7 talents were selected instead of 5 ^^;;;

Congratulations to all the winners of the audition! I look forward to the upcoming seasons with these new members and I can’t wait to see what Cosplay: The Series will throw at us in the next season.

More event photographers can be found here.

If you haven't watched the series yet,  pop over to COSPLAY: The Series' Website now . The 18 episodes are less than 2 hours in total and it’s 2 hours you wont regret spending!

Also subscribe to them on YouTube and like their Facebook page to be updated with their latest news!

From what was announced during the event, A LOT of new releases such as novel, manga, Visual Novel, Game and CTS’s very own Lolita fashion line will be hitting us soon!